SpringBoot RESTful 웹 서비스 구축하기

SpringBoot 를 이용하여 "Hello, World" RESTful 웹서비스를 생성하는 방법을 알아보겠습니다.
● SpringBoot 테스트 과제
1. JSON 표현으로 데이터 응답하기
- {"id" : test, "content" : "Hello, World"}
2. 쿼리 문자열에 매개변수를 입력하여 content 값 변경하기
- http://localhost:8080/springboot-test/name=SpringBoot
3. 매개변수 값을 전달했을 때 변경된 JSON 데이터 응답하기
- {"id" : test, "content" : "Hello, SpringBoot"}
● 개발환경
- Eclipse 2022-06
- JDK 1.11
- Gradle 7.4.1
● SpringBootApplication 시작하기
- testController 리소스 컨트롤러 파일을 생성합니다.
- RESTful 웹 서비스를 구축하는 Spring의 접근 방식에서 HTTP 요청은 컨트롤러에 의해 처리됩니다. 이러한 구성 요소는 @RestController주석 으로 식별되며 testController다음 목록( from src/main/java/com/example/demo/testController.java) 에 표시된 클래스 의 새 인스턴스를 반환하여 GET요청을 처리합니다.
-이 컨트롤러는 간결하고 단순하지만 내부에는 많은 로직이 있습니다. @GetMapping주석은 HTTP GET 요청 이 메서드 /test에 매핑되도록 합니다.
-기존 MVC 컨트롤러와 RESTful 웹 서비스 컨트롤러의 주요 차이점은 HTTP 응답 본문이 생성되는 방식입니다. HTML에 대한 인사말 데이터의 서버 측 렌더링을 수행하기 위해 보기 기술에 의존하는 대신 이 RESTful 웹 서비스 컨트롤러는 개체를 채우고 반환합니다. 개체 데이터는 JSON으로 HTTP 응답에 직접 기록됩니다.
Java - AtomicLong
AtomicLong은 Long 자료형을 갖고 있는 Wrapping 클래스입니다.
Thread-safe로 구현되어 멀티쓰레드에서 synchronized 없이 사용할 수 있습니다.
또한 synchronized 보다 적은 비용으로 동시성을 보장할 수 있습니다.
여기에서는 id 값으로 사용합니다.
@RestControllerpublic class testController {private static final String template = "Hello, %s";private final AtomicLong counter = new AtomicLong();@GetMapping("/test")public testBean test(@RequestParam(value="name", defaultValue = "World") String name) {return new testBean(counter.incrementAndGet(), String.format(template, name));}}
- testBean 파일을 생성합니다.
public class testBean {public final long id;public final String name;public testBean(long id, String name) {this.id = id;this.name = name;}public long getId() {return id;}public String getName() {return name;}}
- SpringBootApplication 실행

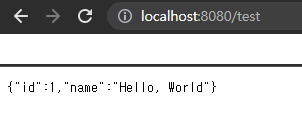
- 인터넷 주소창에 localhost:8080/test 호출

- name 매개변수 값에 SpringBoot 값으로 대체해서 테스트 합니다.


